技术栈选择: Github Pages + Hexo + Travis CI
首要原因:没钱。这是一套免费的组合拳。
在众多站点选择中,最终选择了Github Pages。主要还是因为熟悉Github的版本控制,以及Github对其他平台很好的集成。官方推荐的静态站点生成器(static site generator)是Jekyll。还可以在项目仓库Settings页面中的Github Pages部分,选择Jekyll的theme。
Hexo也是一款静态站点生成框架(static site generator),基于Node.js 。通过Hexo可以使用Markdown来写文章,不用太关注排版和格式。而且Hexo比较成熟,有很多稳定的好看的主题。
Travis CI 是持续集成(continuous integration)的平台,可以监控repo具体分支上的代码变动,自动触发build和test。帮助实现频繁的merge小段代码的Best practice。有了自动部署,就可以不受开发平台限制,不需要搭建环境也可以发布文章。
安装环境
安装并配置github
安装Node.js 和 npm
npm(Node Package Manager), 是用来开发和分享Javascript代码的工具。在这里https://nodejs.org/en/download/下载Node.js的最新版本,就包含了NPM。
打开Command Prompt,验证安装成功了Node.js和NPM。
1
2
3
4
5
$ node –v
v12.17.0
$ npm –v
6.14.4安装Hexo
1
2
3
4
5
6
7
$ npm install -g hexo-cli
$ hexo -v
hexo-cli: 3.1.0
os: Windows_NT 10.0.18363 win32 x64
node: 12.17.0
...安装Hexo-deployer-git
1
$ npm install hexo-deployer-git --save
初始化Hexo+Github Pages项目
初始化
.github.io为Hexo项目 1
2
3
4
5
6
7
8
9
10
11$ mkdir <YourName>.github.io
$ cd <YourName>.github.io
$ hexo init
INFO Copying data to ~/***/<YourName>.github.io
INFO You are almost done! Don't forget to run 'npm install' before you start blogging with Hexo!
$ npm install
$ git init初始化后的目录如下:
.
├── _config.yml #站点的配置文件
├── package.json #应用的基本信息和依赖应用
├── scaffolds #模板文件夹。新建文章时候,默认填充的内容模板。
├── source #markdown和html文件会被解析存放在public文件夹中
| ├── _drafts #新建的draft会保存在这里
| └── _posts #新建post的时候会保存在这里
└── themes #主题文件夹,根据主题来生成静态页面Github上创建一个
.github.io为名的公开的代码库。其中Yourname应该跟你的Github用户名保持一致。 为了防止错误,不要用 README, license, 或者
gitignore文件初始化项目.代码库Settings中查看Github Pages相关设置,你就拥有了自己的站点:https://
.github.io。对于个人站点,只能将master分支设置为发布来源。 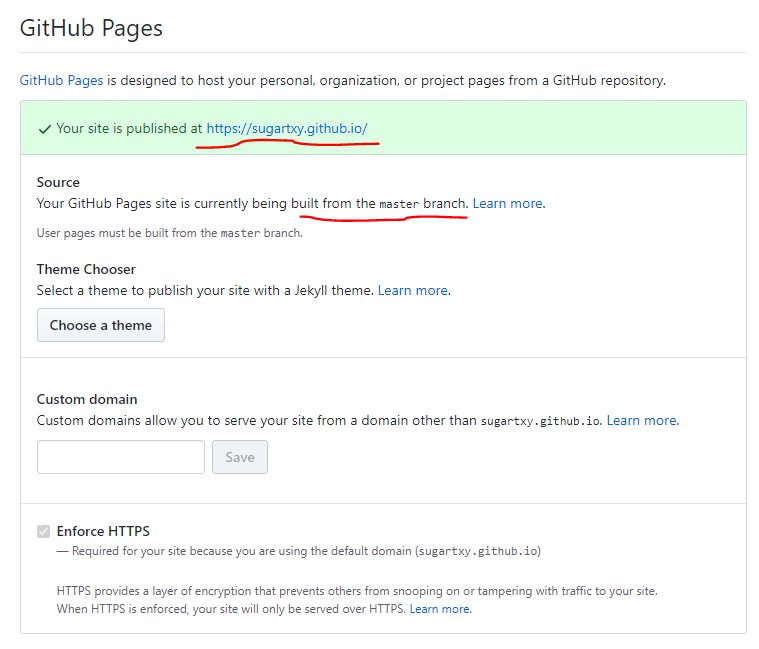
复制代码库的URL。
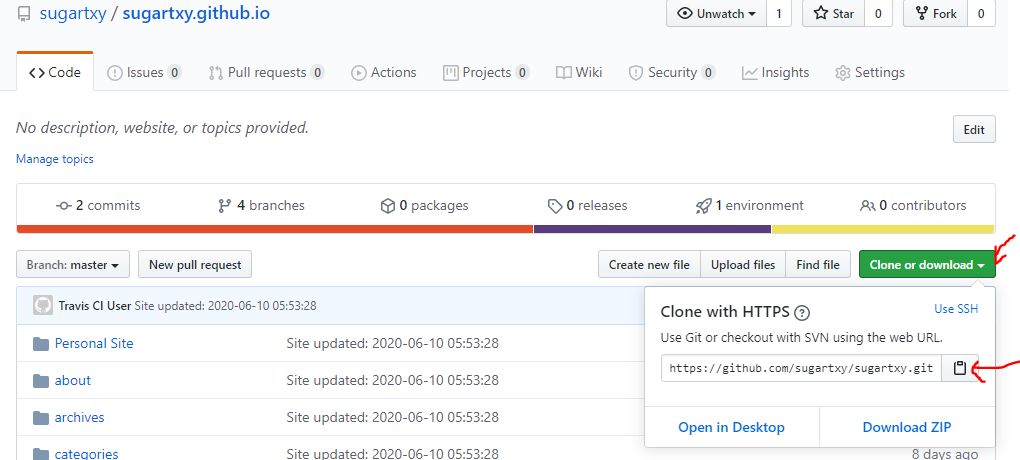
在本地代码库添加remote upstream
1
2
3
4$ git remote add origin remote-repository-URL
# Sets the new remote
$ git remote -v
# Verifies the new remote URL根据文档,修改_config.yml文件中关于站点的配置信息。
执行以下命令, 验证效果
1
2
3
4$ hexo clean
$ hexo generate
$ hexo server
INFO Hexo is running at http://0.0.0.0:4000/. Press Ctrl+C to stop.
添加博客主题
Fork hexo-theme-next 项目到自己的仓库.
运行以下命令将 Fork 出来的仓库 pull 到本地子模块
1
2cd <YourName>.github.io
git submodule add https://github.com/<YourName>/hexo-theme-next.git themes/next
运行该命令后会在项目根目录生成 .gitmodules 文件,文件内容如下:
1 | [submodule "themes/next"] |
对主题进行个性化配置后,先要 check in子模块,在 theme/next 目录下依次执行:
1
2
3
4cd theme/next
git add .
git commit -m "update config file"
git push origin master切换到项目根目录,打开站点配置文件(
.github.io/_config.yml),修改theme字段, 使得主题修改生效。 1
theme: next
执行以下命令, 验证效果
1
2$ hexo server
INFO Hexo is running at http://0.0.0.0:4000/. Press Ctrl+C to stop.在项目根目录下,将代码check in到项目仓库下:
1
2
3
4cd <YourName>.github.io
git add .
git commit -m "add submodule"
git push origin master
生成博客并部署
执行以下命令生成新的博客
1
2$ hexo new post <title>
INFO Created: ~/<YourName>/<YourName>.github.io/source/_posts/<title>.md将博客内容写在新创建的markdown文件里。
如果themes/next路径下的内容做了改变,在themes/next路径下,将更改的代码check in到刚刚Fork的repo中。
在YourName.github.io项目路径下,将更改的代码check in到YourName.github.io repo 的master分支.
在本地部署。使用后续Travis CI配置后,可以省略此步骤。
4.1 修改配置文件
_config.yml中关于部署的字段1
2
3
4deploy:
type: git
repository: https://git@github.com/<YourName>/<YourName>.github.io.git
branch: master4.2 执行以下命令部署站点,当执行
hexo deploy时,Hexo 会将public目录中的文件和目录推送至_config.yml中指定的远端仓库和分支中,并且完全覆盖该分支下的已有内容。1
2
3$ hexo clean # 清除缓存文件(db.json)和已经生成的静态文件(public)
$ hexo generate # 生成静态文件
$ hexo deploy # 部署网站
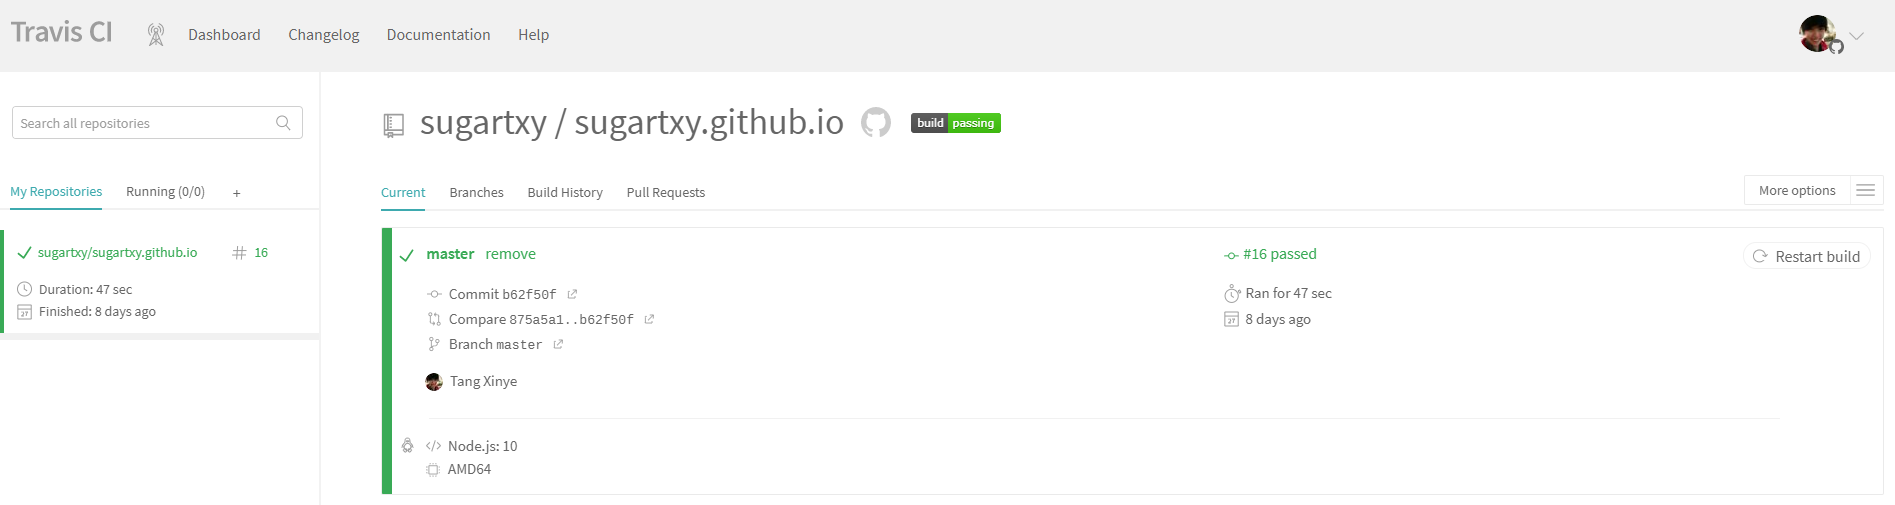
使用Travis CI自动化部署
Travis CI对于开源的Repository是免费的,只需要拥有Github账户和至少一个项目,在项目中增加.travis.yml文件,就可以使用Travis CI。Hexo文档中详细说明了如何使用Travis CI将Hexo自动部署到Github Pages。只需要做如下修改:
修改.travis.yml文件
1
2
3
4
5
6
7
8
9
10
11
12
13
14
15
16
17
18
19
20
21
22
23
24
25
26
27
28
29sudo: required
language: node_js
node_js:
- 10 # use nodejs v10 LTS
branches:
only:
- master # build master branch only
# Start: Build Lifecycle
install:
- npm install -g hexo-cli
- npm install
- npm install hexo-deployer-git --save
# 设置git提交名,邮箱
- git config user.name "<YourName>"
- git config user.email "<YourEmail>"
# 替换同目录下的_config.yml文件中gh_token字符串为travis后台刚才配置的变量,注意此处sed命令用了双引号。单引号无效!
- sed -i "s/gh_token/${GH_TOKEN}/g" ./_config.yml
script:
- hexo clean
- hexo generate # generate static files
after_success: # 只有前面步骤成功了才会触发
- hexo deploy
# End: Build LifeCycle
修改_config.yml文件
1
2
3
4
5deploy:
type: git
# 下方的gh_token会被.travis.yml中sed命令替换
repo: https://gh_token@github.com/<YourName>/<YourName>.github.io.git
branch: master
这样每一次更新博客,只需要check in Markdown文件到master 分支,就会自动部署。在Travis CI网站中可以看到部署的状态。
其他问题
1. 添加评论系统-gitalk
参考文献:https://www.standbyside.com/2018/12/04/add-comment-function-to-next/
1.1 进入github新建一个认证application
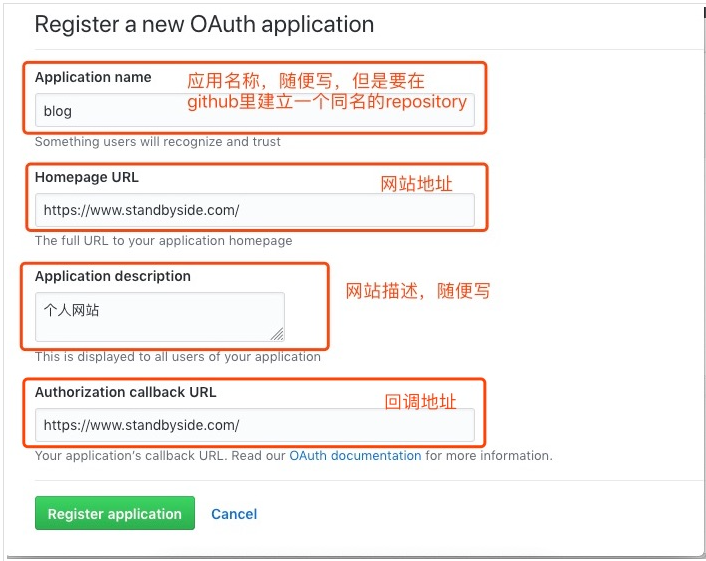
创建完后会生成这个application对应的 Client ID 和 Client Secret
1.2 在自己的github中创建一个同名的repository
以后每篇文章都会对应这里的一个issue,这篇文章的comments和like都会记录到对应的issue里。
1.3 Next主题v7.6.0中已经集成了gitalk,只需要进入主题的_config.yml里修改comments相关属性
1 | comments: |
2. 本地图片无法显示
参考文献:https://merrier.wang/20190111/image-skills-in-hexo.html
2.1 在路径 yourName.github.io/source下创建images文件夹,将图片全部放在这个文件夹下。
2.2 Markdown访问图片方式:
1 |  |
参考文献
Next中文教程:https://theme-next.iissnan.com/getting-started.html#description-setting
Hexo中文教程:https://hexo.io/zh-cn/docs/
Github Pages中文教程:https://help.github.com/cn/github/working-with-github-pages
Travis官方文档:https://docs.travis-ci.com/user/tutorial/